The following simple solution explains how to remove the Safely Remove Hardware Icon. This tutorial is specifically tailored to those who have installed SATA drives on a board that utilizes the nVidia nForce chipset and SATA drivers. Once the SATA drivers are installed, the icon appears, misleading the user into believing that the internally attached Hard Drives can be safely removed from the system.
Removing the Safely Remove Hardware Icon:
This process applies to motherboards that utilize the nForce SATA controller. Depending on the driver version you have installed, the registry path in step two may differ. I have seen the final path being nvatabus or in some cases simply nvata.
- Click Start > Run, type regedit and then press Enter
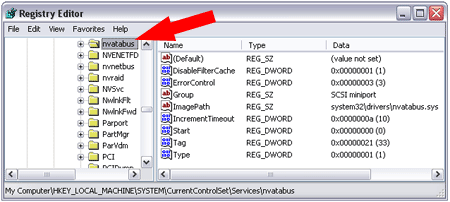
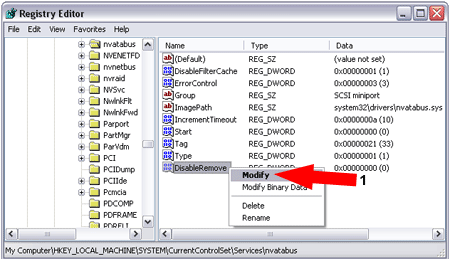
- From the registry editor, navigate to HKEY_LOCAL_MACHINE\SYSTEM\CurrentControlSet\Services\nvatabus
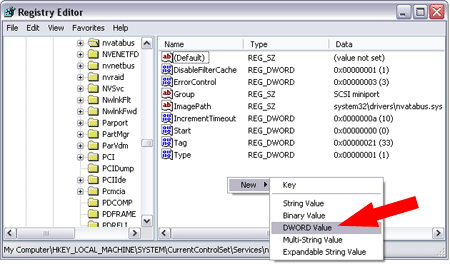
- Right click within the Window and Create a new DWORD value called DisableRemovable
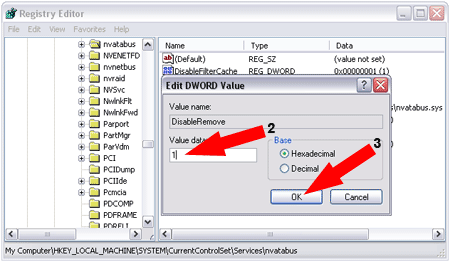
- Next, right click DisableRemovable and select Modify. Enter a value of 1 and click Ok
- Now, Simply restart your computer

If all goes well, the Safely Remove Hardware Icon should be gone. Of course, the icon will still function as it should if you insert a removable device such as a portable USB Hard Drive, Flashdrive or Camera. But it should no longer ridiculously state that you can remove your internal SATA Hard Drives.
Enjoy! ;)
